This is the multi-page printable view of this section. Click here to print.
Tutorials
- 1: Notifications
- 2: API
- 2.1: Indexers
- 3: OpenID Connect with Authentik
- 4: Update indexer configuration from file
1 - Notifications
Notifications allow you to send a POST request/webhook wherever you want. ABR works with all major notification systems like apprise, gotify, ntfy, and discord.
Here are a few examples for how the notifications body looks for different notification systems:
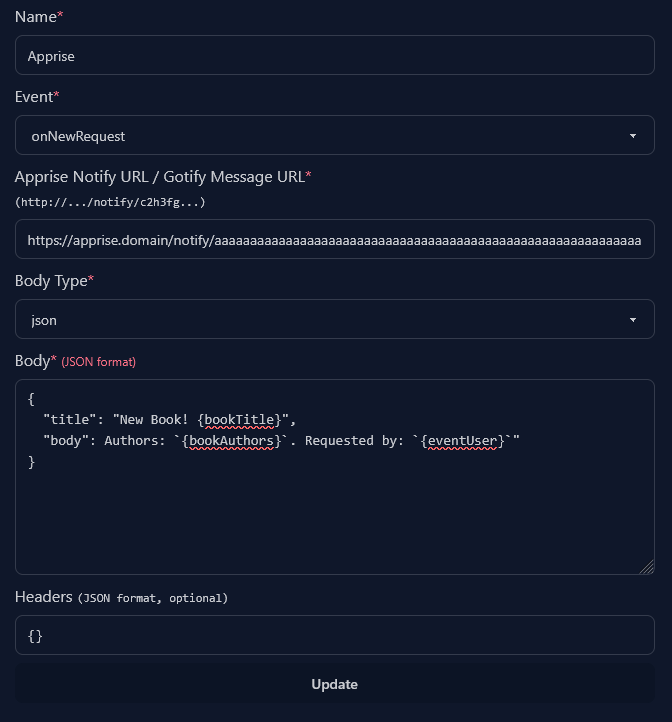
Apprise
For apprise you’ll want to have the title in "title" and the message body in
"body".
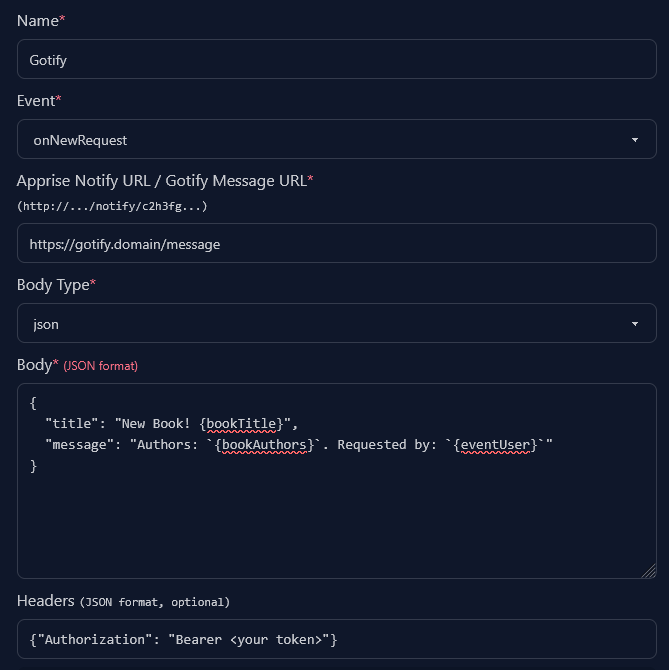
Gotify
For gotify you’ll want to have the title in "title" and the message body in
"message". Gotify also requires you to pass in your authorization token in the
header.
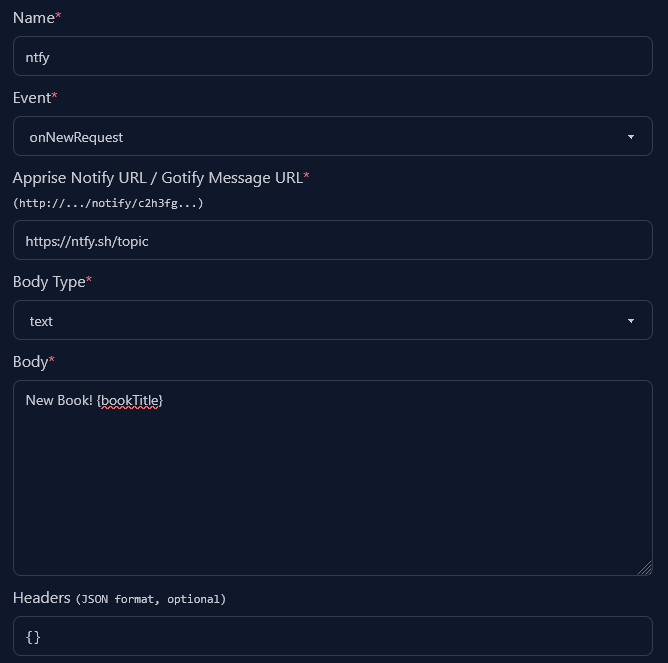
Ntfy
Ntfy does not differentiate between title and body. You’ll want to select the
text body type and then add your message.
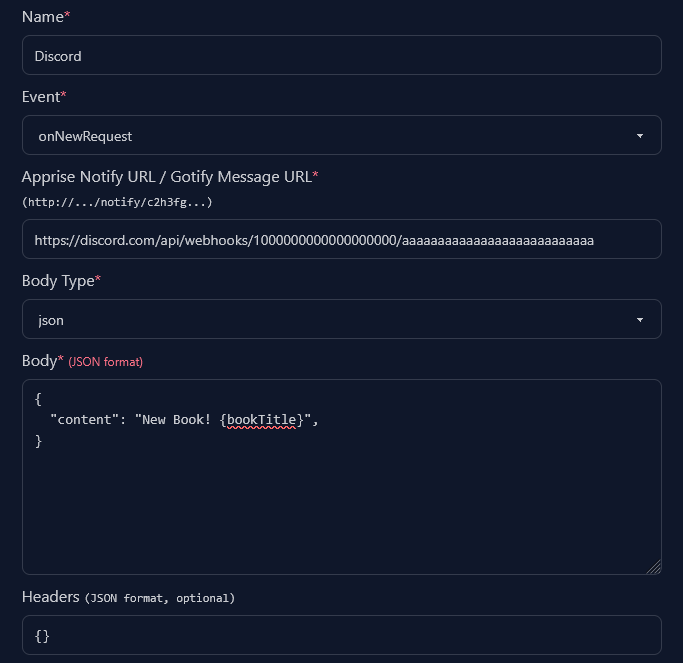
Discord
You can send notifications to discord by using webhooks. Discord allows you to send plain messages or create bigger messages with embeds.
To make better looking webhook messages you can also use a message builder like one of the following pages:
- https://message.style/app/editor (Copy the JSON code)
- https://discohook.app (
Options>JSON Editorto export)
Tip: Using the Extra Data field in the Settings>Users tab, you can add the Discord user ID as extra data. Then you can make notifications ping the given user by adding <@{eventUserExtraData}> to the notification message.
2 - API
Overview
AudioBookRequest provides a RESTful API for a select few endpoints.
The API uses Bearer token authentication with API keys that can be generated through the web interface.
How to Create an API Key
Follow these steps to create an API key for accessing the AudioBookRequest API:
- In the Account settings page, look for the API Keys section
- Enter a unique name for your API key
- Click on Create API Key
- Important: The API key will only be displayed once for security reasons
- Copy the generated API key immediately and store it in a secure location
- If you lose the key, you’ll need to generate a new one
Use Your API Key
Include your API key in the Authorization header of your API requests:
Authorization: Bearer <your-api-key>
Example using cURL:
curl -H "Authorization: Bearer <your-api-key-here>" https://abr.example.com/api/users/me
API Documentation
For a SwaggerUI documentation with interactive testing capabilities:
- Set the environment variable
ABR_APP__OPENAPI_ENABLED=true - Head to
<your-domain>/docs.
2.1 - Indexers
There are two main endpoints to work with indexers:
- A
PATCHto update indexer settings. - A
GETto get all the available configuration settings for the indexers.
Head to the main API Docs to see how you can access the SwaggerUI and more easily test the endpoints.
Getting the Indexer Configurations
To figure out what values you need to adjust, GET the endpoint
/api/indexers/configurations.
This will give you something along the lines of this:
{
  "MyAnonamouse": [
    {
      "name": "mam_session_id",
      "description": null,
      "default": null,
      "required": true,
      "type": "str"
    }
  ]
}
This gives you the full information about what values can be adjusted.
(Optional) You can additionally enable/disable an indexer by setting the
enabled value to true or false.
Updating Indexer Settings
You can update indexer settings by sending a PATCH request to
/api/indexers/{indexer name}. The name is case-sensitive. The body has to
be a JSON object with key-value pairs of the values you want to update.
Here is an example using cURL: as
curl -X 'PATCH' \
    'https://abr.example.com/api/indexers/MyAnonamouse' \
    -H 'accept: application/json' \
    -H 'Authorization: Bearer MaEqMYAGY3qvXxtje6-YDxcs4damlyRaKzTC8itG2b8' \
    -d '{"mam_session_id":"bXDv1tC1d2MVvOypbFy8Q4Q-rz6q-bKwdqaSZzm85Dg", "enabled": true}'
3 - OpenID Connect with Authentik
OIDC allows you to use the same login across multiple apps. This guide will show you how to set up OIDC with Authentik, but the concepts are the same or similar for other providers.
Setup a provider on Authentik
-
You want to first create an application on Authentik. The settings here don’t play a role for AudioBookRequest though.
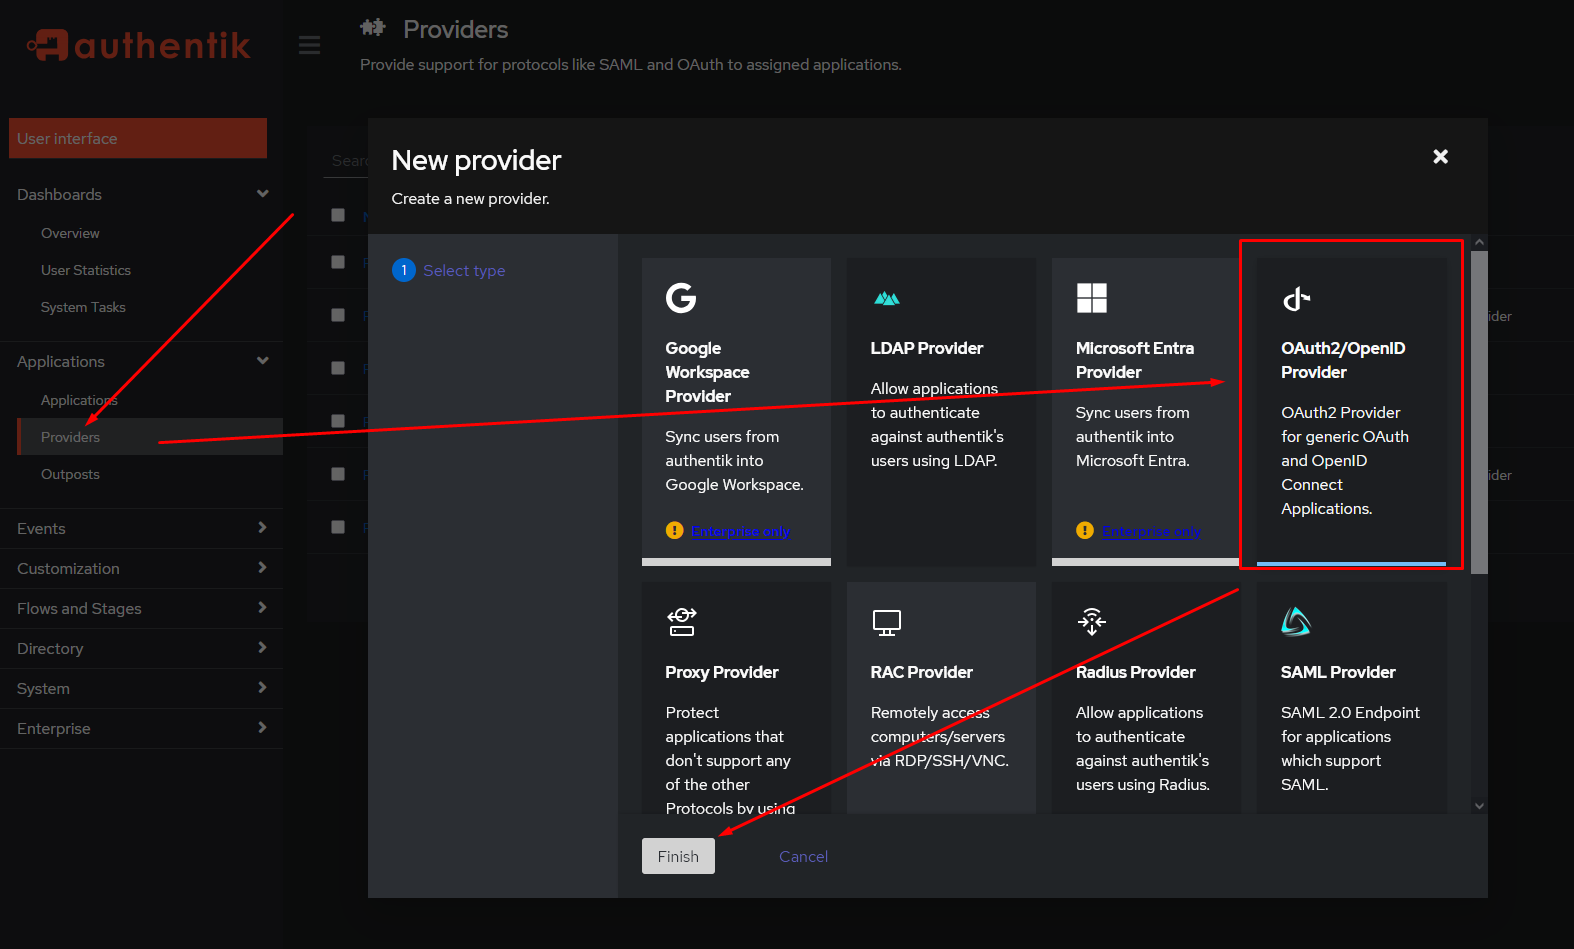
-
You then want to create an OAuth2/OpenID Provider:
-
Configure the settings as preferred. The important two values are the
Client IDandClient Secret. Take note of those. You should also set the redirect URL that the OIDC provider will redirect you to after a succesful login. This has to be the domain of your ABR instance with/auth/oidcappended.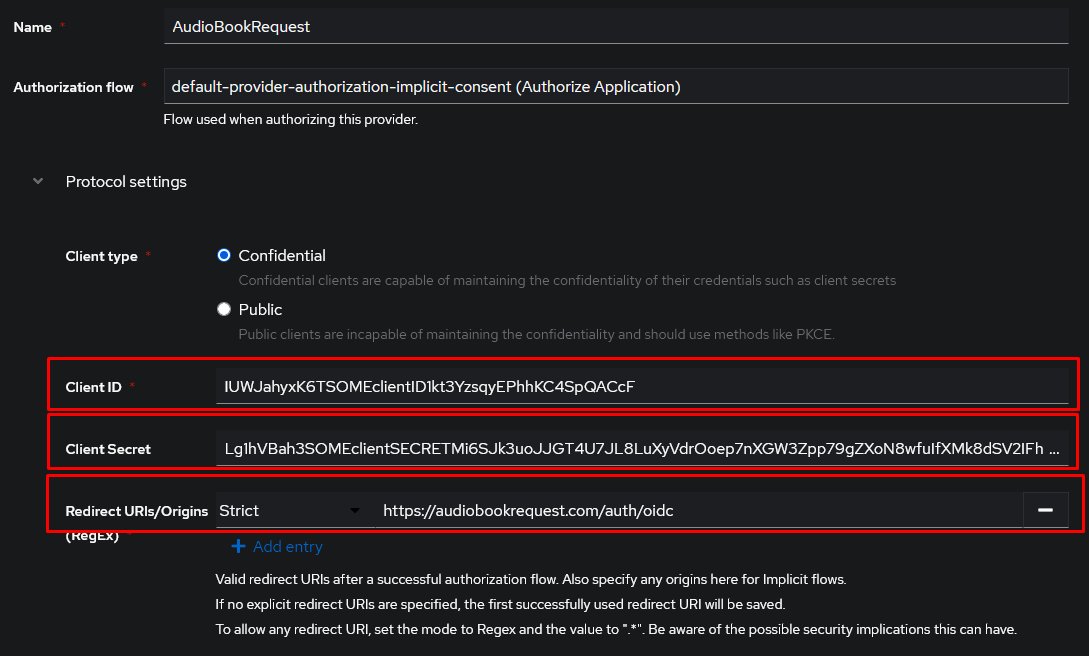
Warning
Make sure you correctly sethttporhttpsin the redirect URL. This depends on how you access AudioBookRequest. -
Set the scopes that ABR can get access to. You should always allow for the
openidscope. Any other scopes are optional. You’ll have to check with your OIDC provider to see what what scopes are required to get a name/username and groups. “Subject mode” is a unique identifier for the user. This can be used as the username on ABR.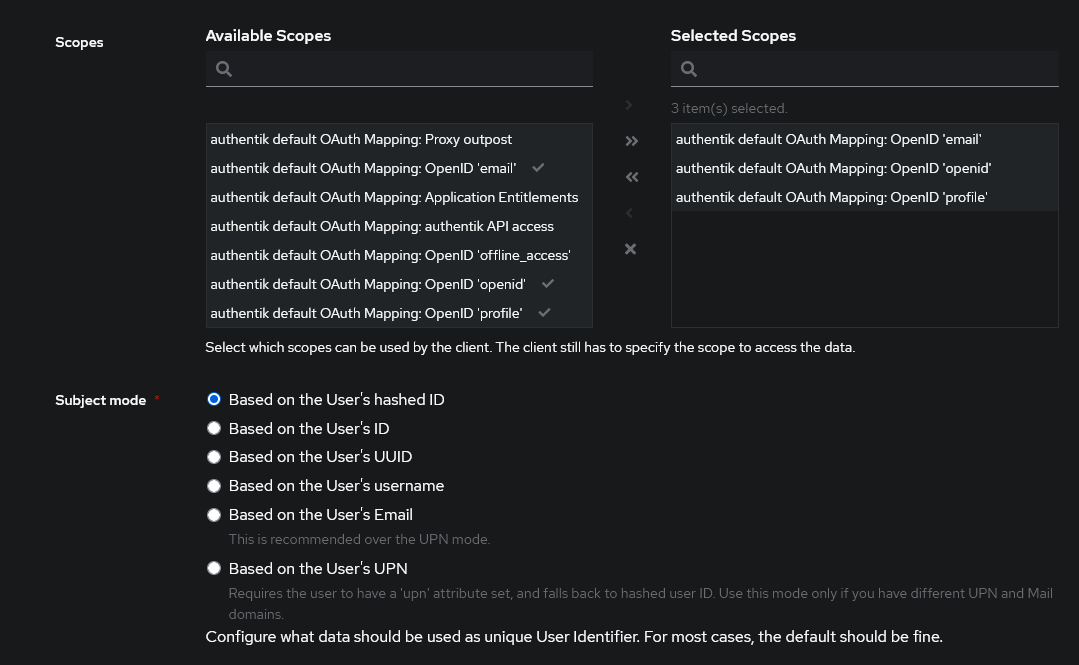
-
Assign your newly created provider to the ABR application.
Setup settings in ABR
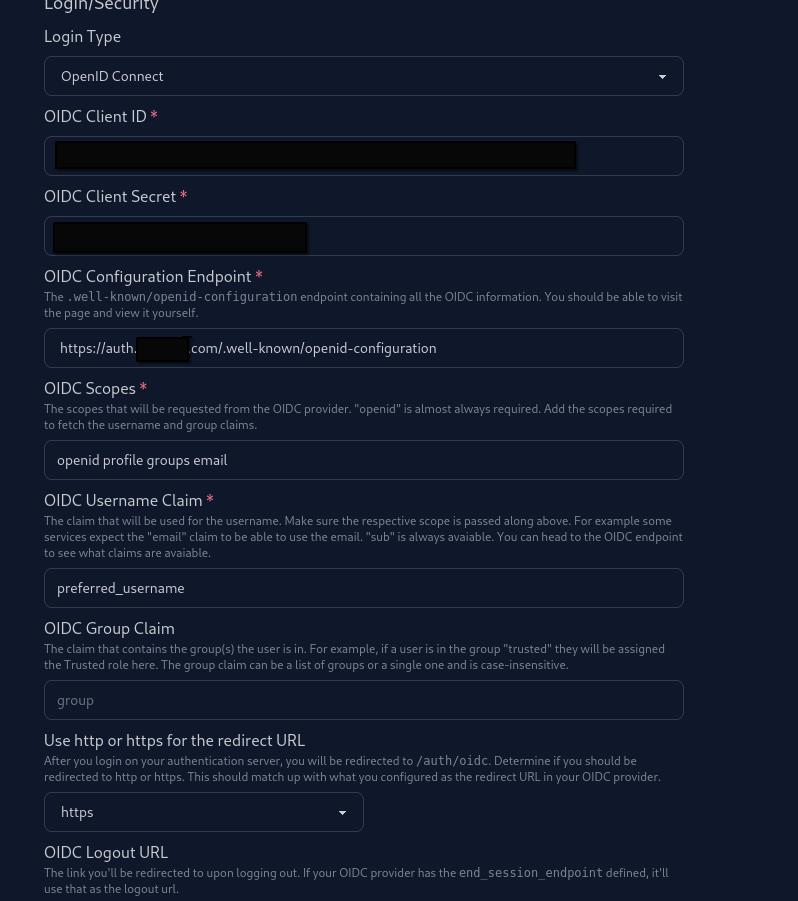
- On AudioBookRequest, head to
Settings>Securityand set the “Login Type” to “OpenID Connect”. - Paste the “Client ID” and “Client Secret” into the respective fields.
- Your “OIDC Configuration Endpoint” depends on the OIDC provider you use. For Authentik, it’s usually along the lines of https://domain.com/application/o/audiobookrequest/.well-known/openid-configuration. You’ll have to find that for your own provider. Visiting the url should give you a JSON-formatted object with different endpoints and details given.
- The “OIDC Scopes” are the ones defined above separated by a space.
openidis always required. Any other scopes likeemailorgroupare only required if you intend to use the email for the username or respectively extract the group of the user. - “OIDC Username Claim” has to be a unique identifier which is used as the
username for the user.
subis always available, but you might prefere to useemailorusername(with the correctly added scope). - Depending on what you used above for the redirect URL, set
httporhttps.Warning
http/shas to match-up with what protocol your redirect-url uses. Providers will reject logins if this does not match up. - Optional: The “OIDC Logout URL” is where you’re redirected if you select to log out in ABR. OIDC Providers allow you to invalidate the session on this URL. While this value is optional, not adding it might break logging out slightly because the session can’t properly be invalidated.
Groups
“OIDC Group Claim” is optional, but allows you to handle the role distribution of users in your OIDC provider instead of in ABR. The exact claim that sends along the information depends on your OIDC provider. The OIDC provider can provide a single string or list of strings.
The groups have to be named exactly one of untrusted, trusted, or admin.
The letter case does not matter.
groups and requires the
profile scope. If you assign a user to a group named trusted, that user will
receive the Trusted role once they login to AudioBookRequest.
3.1 - OpenID Connect with Authelia
Fundamentally it should be similar to how Authentik is setup. This page just shows an example config you can use.
There’s a relevant Authelia Github Issue for a little more information.
Use the following config:
client_id: 'clientID'
client_name: 'AudioBookRequest'
client_secret: '[secret]'
public: false
authorization_policy: 'one_factor'
require_pkce: 'false'
redirect_uris:
  - 'https://abr.example.com/auth/oidc'
scopes:
  - 'openid'
  - 'profile'
  - 'groups'
  - 'email'
response_types:
  - 'code'
grant_types:
  - 'authorization_code'
access_token_signed_response_alg: 'none'
userinfo_signed_response_alg: 'none'
token_endpoint_auth_method: 'client_secret_post'
Importantly:
redirect_urisneeds to end with/auth/oidctoken_endpoint_auth_methodneeds to beclient_secret_post(not ending in...basic)
Here’s an example configuration on ABR in the Security settings:
4 - Update indexer configuration from file
Overview
You can set up a JSON file that will be used to populate the indexer configuration options. This can be useful if you have a value that needs to constantly change, but you don’t want to have to work with the ABR API.
How to set up file configuration
- Create a JSON file with the desired options. The layout is a 2-layer object.
The top-level is an object with key for each indexer type (for example
MyAnonamouse). The value is an object containing a key for each config that you want to update. - Ensure the JSON file is visible by ABR. Add it as a volume or copy it into the Docker container.
- Head to
Settings>Indexers - At the bottom, enter the path to the JSON file. It’s best to pass in an absolute path.
- You’re done! ABR will now check for updates to the file and update the configurations if there’s ever any change.
Example
This is an example of a legal JSON file that would update the mam_id.
{
  "MyAnonamouse": {
    "mam_session_id": "test3"
  }
}