This is the multi-page printable view of this section.
Click here to print.
Return to the regular view of this page.
Getting Started
What does your user need to know to try your project?
Prerequisites
AudioBookRequest has been packaged as a Docker image
to make it easy to deploy and run on servers. While it is possible to run ABR
without Docker, that option should be avoided if possible and only used for
local development, as a lot of things can change from version to version.
Setup
Head to Running the app for instructions on how to run ABR.
1 - Running the app
Getting AudioBookRequest up and running.
The app has a docker image that simplifies the deployment. The preferred methods
of running the application all revolve around running the Docker image in
different ways.
Select the method you want to use to deploy below or if your tool is not listed
(for example Portainer), head to the docker page.
1.1 - Docker
How to get started using Docker.
If you prefer to run the app manually with docker, you can simply run the
following command:
docker run -p 8000:8000 -v $(pwd)/config:/config markbeep/audiobookrequest:1
This will start the container on port 8000 and create the config/ directory in
your current working directory.
The above command might break on Windows. Instead, use
${PWD}\config:/config ... in PowerShell or %cd%\config:/config ... in
Windows Command Prompt.
Versions
The :1 at the end denotes the image version.
Check dockerhub for
any other versions you can use instead.
The :latest tag will give you the last non-nightly release, but it is not
recommended incase of changes that are not backwards compatible.
For experimental builds (latest commits in the main branch of the repository),
the :nightly version tag can be used.
1.2 - Docker Compose
How to get started using Docker-Compose.
Docker-compose works the similar way as Docker.
The basic docker compose file is as follows:
services:
  web:
    image: markbeep/audiobookrequest:1
    ports:
      - '8000:8000'
    volumes:
      - ./config:/config
If you want to add any environment variables, you can add them as explained
here.
It would look along the lines of this:
services:
  web:
    image: markbeep/audiobookrequest:1
    ports:
      - '8000:5432'
    volumes:
      - ./config:/config
    environment:
      ABR_APP__PORT: 5432
      ABR_APP__OPENAPI_ENABLED: true
1.3 - Kubernetes
How to get started using Kubernetes.
Here’s an example for a kubernetes deployment file you’d use:
apiVersion: apps/v1
kind: Deployment
metadata:
  name: audiobookrequest
  labels:
    app: audiobookrequest
spec:
  replicas: 1
  selector:
    matchLabels:
      app: audiobookrequest
  template:
    metadata:
      labels:
        app: audiobookrequest
    spec:
      containers:
        - name: audiobookrequest
          image: markbeep/audiobookrequest:1
          imagePullPolicy: Always
          volumeMounts:
            - mountPath: /config
              name: abr-config
          ports:
            - name: http-request
              containerPort: 8000
      volumes:
        - name: abr-config
          hostPath:
            path: /mnt/disk/AudioBookRequest/
For the volume you can assign it a host path on a node, or assign it to a PVC.
1.4 - Bare Metal
How to get started without Docker.
Warning
The bare metal approach should
only be the last option. Try to get it working with Docker or get support on the
Discord server before trying to set ABR up for a bare metal deployment.
There are no guarantees that if one version works locally that it won’t suddenly
break in the next because of a new dependency, new file structure or something
else.
To run ABR locally without Docker, the same steps as for the
local development have to be followed. First, follow
the instructions to get local development working.
Once local development works, there are a few adjustments that have to be made
to run the app in production mode instead of debug/local mode.
- Delete the
.env.local file or delete all contents in it.
- Run the python script to fetch and download all required javascript files:
uv run python /app/util/fetch_js.py. This should populate your static/
directory with some new js files.
- Instead of running
fastapi dev you want to execute fastapi start to start
the webserver.
- Create a file called
.env and place any environment variables you want to
set in there.
- If you intend to change the port (documented as the env variable
ABR_APP__PORT), you’ll have to run fastapi with the --port <PORT> flag:
With these changes your deployment will be running in production mode.
2 - First Login
Logging in the first time
Once you get AudioBookRequest running, you’ll be greeted with an initialization
page when you visit the website.
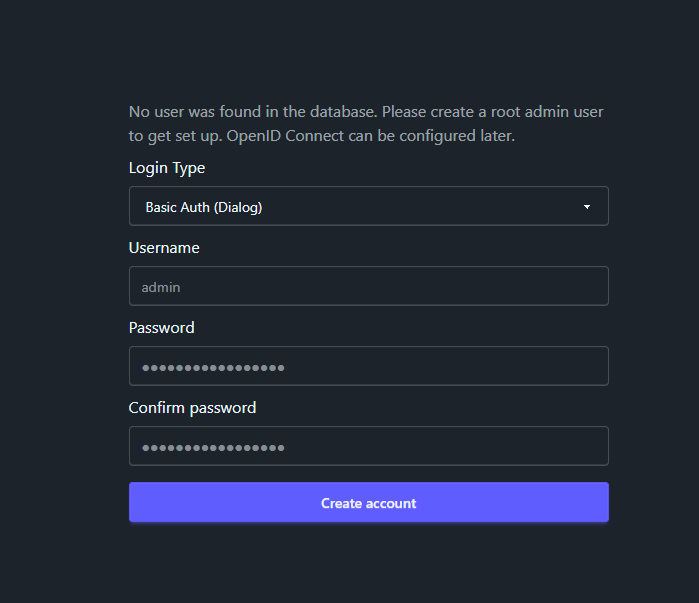
On this page you have to set the type of login you want to use for the app and
then create the login details for the root admin. You can choose from 3 login
types on this page:
- Basic Auth: This is the most simple form of login. Your browser will show
a popup login dialog which will then be used to log in to the site. Password
managers usually don’t work for this type of login, but because it is very
simple you can also easily send authenticated requests in scripts.
Read more here.
- Forms: This is the standard type of login where you fill out a login-form.
Password managers usually work with this.
- None: This turns off all authentication. This is best if you have a proxy
and are the only user or you don’t mind everyone having root access to the
site.
OpenID Connect
AudioBookRequest supports logging in with
OpenID Connect. You’ll have to first select one of the login-types above to be
able to adjust the OIDC settings. Head to the
OIDC Tutorial for more info.
Warning
Even if you intend to turn off all
authentication or want to later use OIDC, you should take note of the
username/password you set. You’ll need them once you decide to ever change the
login type.