This is the multi-page printable view of this section.
Click here to print.
Return to the regular view of this page.
Documentation
Welcome to the documentation for AudioBookRequest.
What is it?
AudioBookRequest is a tool that can be used in combination with media servers
like plex/audiobookserver/jellyfin/etc. to easily set up a pipeline for creating
a wishlist of audiobooks you want to listen to.
Why do I want it?
Help your user know if your project will help them. Useful information can
include:
-
What is it good for?: If you have multiple people using your ABS instance
and you don’t want them to always have to message you for new books or you
don’t want to give them access to something like Readarr/Prowlarr, you can use
AudioBookRequest to allow them to easily request any books they want to listen
to and have it notify and/or automatically start any required downloads.
-
What is it not good for?: AudioBookRequest is not a full replacement
for Readarr, nor is that the plan. Readarr does a lot of things, but it is
also currently in a very messy state development-wise. ABR does not currently
keep track of your library, while automatically downloading new releases and
trying to upgrade the quality of already existing audiobooks. These are
features that are less relevant with audiobooks.
-
What is it not yet good for?: AudioBookRequest is currently unable to
move any downloads, add metadata to files, or rename files according to some
structure.
Where should I go next?
Head on over to the following sections to learn more about AudioBookRequest:
1 - Getting Started
What does your user need to know to try your project?
Prerequisites
AudioBookRequest has been packaged as a Docker image
to make it easy to deploy and run on servers. While it is possible to run ABR
without Docker, that option should be avoided if possible and only used for
local development, as a lot of things can change from version to version.
Setup
Head to Running the app for instructions on how to run ABR.
1.1 - Running the app
Getting AudioBookRequest up and running.
The app has a docker image that simplifies the deployment. The preferred methods
of running the application all revolve around running the Docker image in
different ways.
Select the method you want to use to deploy below or if your tool is not listed
(for example Portainer), head to the docker page.
1.1.1 - Docker
How to get started using Docker.
If you prefer to run the app manually with docker, you can simply run the
following command:
docker run -p 8000:8000 -v $(pwd)/config:/config markbeep/audiobookrequest:1
This will start the container on port 8000 and create the config/ directory in
your current working directory.
The above command might break on Windows. Instead, use
${PWD}\config:/config ... in PowerShell or %cd%\config:/config ... in
Windows Command Prompt.
Versions
The :1 at the end denotes the image version.
Check dockerhub for
any other versions you can use instead.
The :latest tag will give you the last non-nightly release, but it is not
recommended incase of changes that are not backwards compatible.
For experimental builds (latest commits in the main branch of the repository),
the :nightly version tag can be used.
1.1.2 - Docker Compose
How to get started using Docker-Compose.
Docker-compose works the similar way as Docker.
The basic docker compose file is as follows:
services:
  web:
    image: markbeep/audiobookrequest:1
    ports:
      - '8000:8000'
    volumes:
      - ./config:/config
If you want to add any environment variables, you can add them as explained
here.
It would look along the lines of this:
services:
  web:
    image: markbeep/audiobookrequest:1
    ports:
      - '8000:5432'
    volumes:
      - ./config:/config
    environment:
      ABR_APP__PORT: 5432
      ABR_APP__OPENAPI_ENABLED: true
1.1.3 - Kubernetes
How to get started using Kubernetes.
Here’s an example for a kubernetes deployment file you’d use:
apiVersion: apps/v1
kind: Deployment
metadata:
  name: audiobookrequest
  labels:
    app: audiobookrequest
spec:
  replicas: 1
  selector:
    matchLabels:
      app: audiobookrequest
  template:
    metadata:
      labels:
        app: audiobookrequest
    spec:
      containers:
        - name: audiobookrequest
          image: markbeep/audiobookrequest:1
          imagePullPolicy: Always
          volumeMounts:
            - mountPath: /config
              name: abr-config
          ports:
            - name: http-request
              containerPort: 8000
      volumes:
        - name: abr-config
          hostPath:
            path: /mnt/disk/AudioBookRequest/
For the volume you can assign it a host path on a node, or assign it to a PVC.
1.1.4 - Bare Metal
How to get started without Docker.
Warning
The bare metal approach should
only be the last option. Try to get it working with Docker or get support on the
Discord server before trying to set ABR up for a bare metal deployment.
There are no guarantees that if one version works locally that it won’t suddenly
break in the next because of a new dependency, new file structure or something
else.
To run ABR locally without Docker, the same steps as for the
local development have to be followed. First, follow
the instructions to get local development working.
Once local development works, there are a few adjustments that have to be made
to run the app in production mode instead of debug/local mode.
- Delete the
.env.local file or delete all contents in it.
- Run the python script to fetch and download all required javascript files:
uv run python /app/util/fetch_js.py. This should populate your static/
directory with some new js files.
- Instead of running
fastapi dev you want to execute fastapi start to start
the webserver.
- Create a file called
.env and place any environment variables you want to
set in there.
- If you intend to change the port (documented as the env variable
ABR_APP__PORT), you’ll have to run fastapi with the --port <PORT> flag:
With these changes your deployment will be running in production mode.
1.2 - First Login
Logging in the first time
Once you get AudioBookRequest running, you’ll be greeted with an initialization
page when you visit the website.
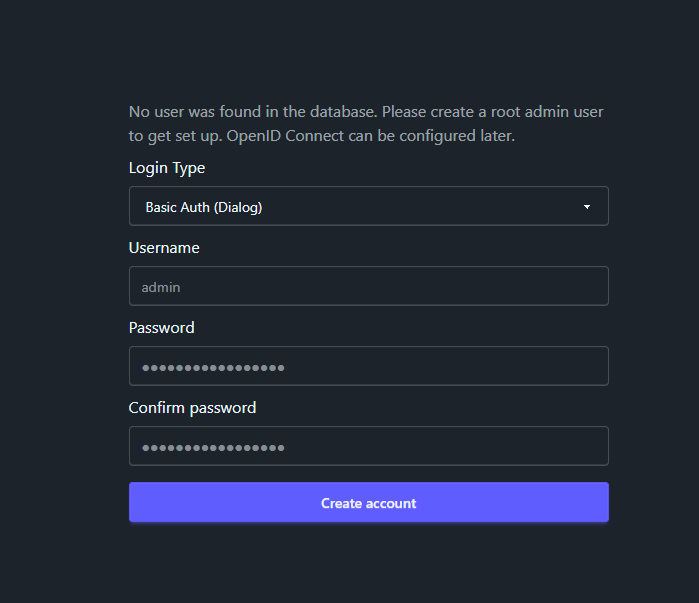
On this page you have to set the type of login you want to use for the app and
then create the login details for the root admin. You can choose from 3 login
types on this page:
- Basic Auth: This is the most simple form of login. Your browser will show
a popup login dialog which will then be used to log in to the site. Password
managers usually don’t work for this type of login, but because it is very
simple you can also easily send authenticated requests in scripts.
Read more here.
- Forms: This is the standard type of login where you fill out a login-form.
Password managers usually work with this.
- None: This turns off all authentication. This is best if you have a proxy
and are the only user or you don’t mind everyone having root access to the
site.
OpenID Connect
AudioBookRequest supports logging in with
OpenID Connect. You’ll have to first select one of the login-types above to be
able to adjust the OIDC settings. Head to the
OIDC Tutorial for more info.
Warning
Even if you intend to turn off all
authentication or want to later use OIDC, you should take note of the
username/password you set. You’ll need them once you decide to ever change the
login type.
2 - Tutorials
Tutorials about how to setup certain features with more detail.
2.1 - Notifications
How to send notifications.
Notifications allow you to send a POST request/webhook wherever you want. ABR
works with all major notification systems like apprise, gotify, ntfy, and
discord.
Here are a few examples for how the notifications body looks for different
notification systems:
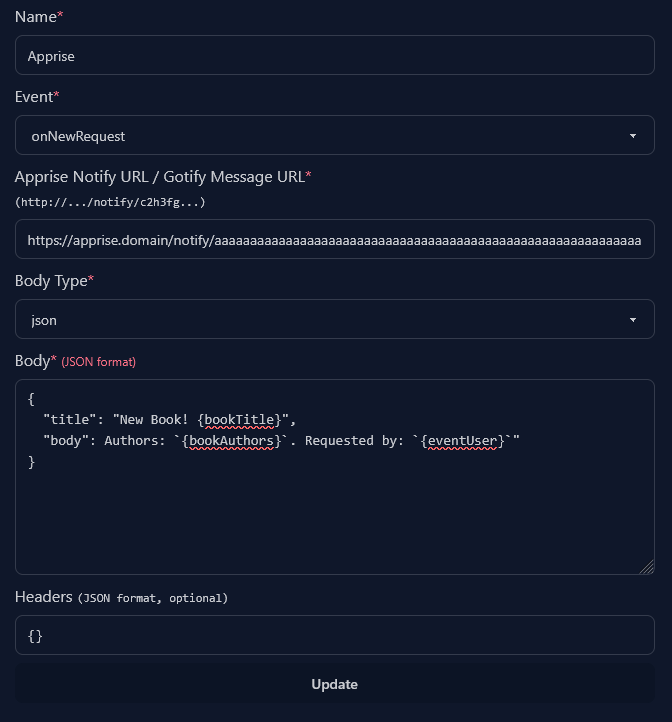
Apprise
For apprise you’ll want to have the title in "title" and the message body in
"body".
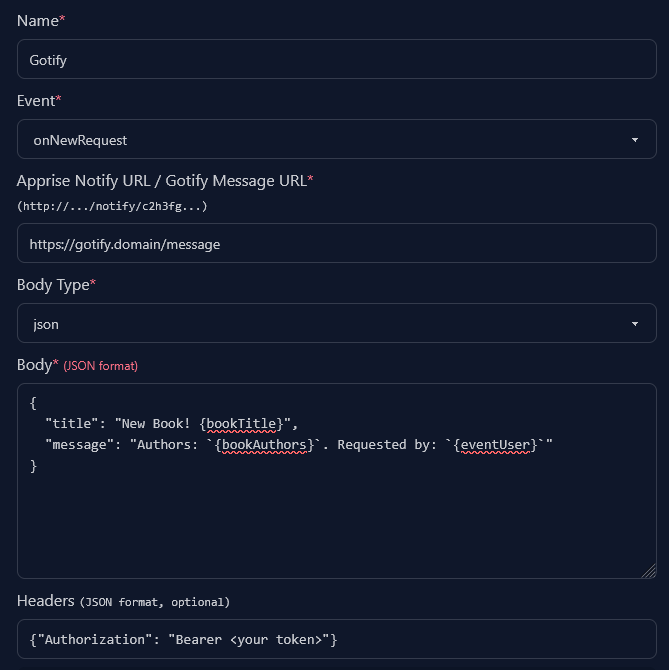
Gotify
For gotify you’ll want to have the title in "title" and the message body in
"message". Gotify also requires you to pass in your authorization token in the
header.
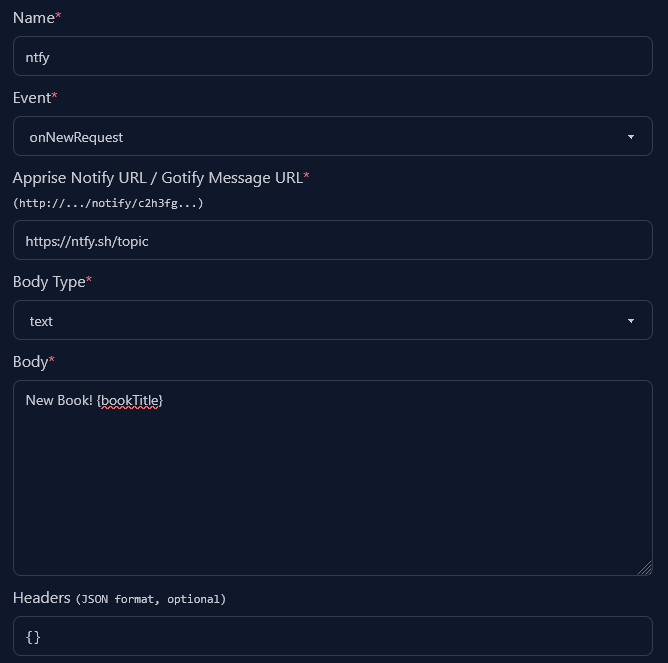
Ntfy
Ntfy does not differentiate between title and body. You’ll want to select the
text body type and then add your message.
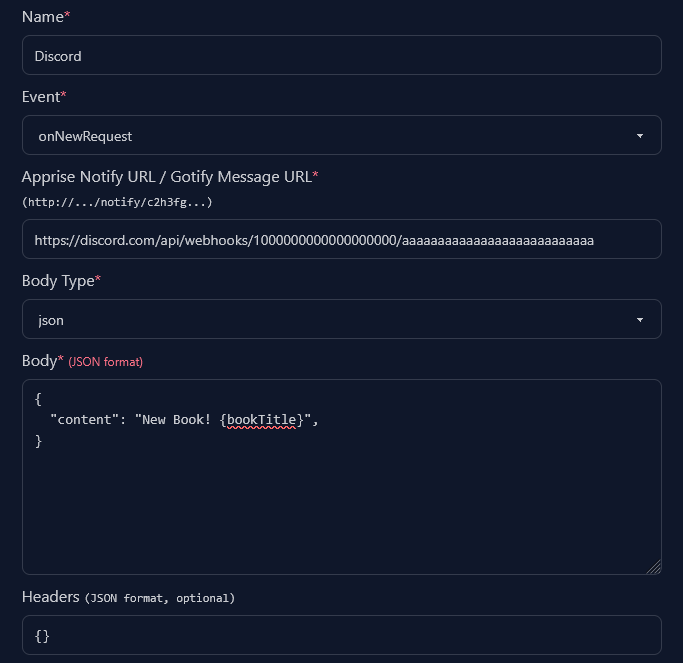
Discord
You can send notifications to discord by using webhooks. Discord allows you to
send plain messages or create bigger messages with embeds.
To make better looking webhook messages you can also use a message builder like
one of the following pages:
Tip: Using the Extra Data field in the Settings>Users tab, you can add the Discord user ID as extra data. Then you can make notifications ping the given user by adding <@{eventUserExtraData}> to the notification message.
2.2 - API
How to use the AudioBookRequest API
Overview
AudioBookRequest provides a RESTful API for a select few endpoints.
The API uses Bearer token authentication with API keys that can be generated
through the web interface.
How to Create an API Key
Follow these steps to create an API key for accessing the AudioBookRequest API:
- In the Account settings page, look for the API Keys section
- Enter a unique name for your API key
- Click on Create API Key
- Important: The API key will only be displayed once for security reasons
- Copy the generated API key immediately and store it in a secure location
- If you lose the key, you’ll need to generate a new one
Use Your API Key
Include your API key in the Authorization header of your API requests:
Authorization: Bearer <your-api-key>
Example using cURL:
curl -H "Authorization: Bearer <your-api-key-here>" https://abr.example.com/api/users/me
API Documentation
For a SwaggerUI documentation with interactive testing capabilities:
- Set the environment variable
ABR_APP__OPENAPI_ENABLED=true
- Head to
<your-domain>/docs.
2.2.1 - Indexers
Using the API to access/update indexers
There are two main endpoints to work with indexers:
- A
PATCH to update indexer settings.
- A
GET to get all the available configuration settings for the indexers.
Head to the main API Docs to see how you can access the SwaggerUI
and more easily test the endpoints.
Getting the Indexer Configurations
To figure out what values you need to adjust, GET the endpoint
/api/indexers/configurations.
This will give you something along the lines of this:
{
  "MyAnonamouse": [
    {
      "name": "mam_session_id",
      "description": null,
      "default": null,
      "required": true,
      "type": "str"
    }
  ]
}
This gives you the full information about what values can be adjusted.
(Optional) You can additionally enable/disable an indexer by setting the
enabled value to true or false.
Updating Indexer Settings
You can update indexer settings by sending a PATCH request to
/api/indexers/{indexer name}. The name is case-sensitive. The body has to
be a JSON object with key-value pairs of the values you want to update.
Here is an example using cURL: as
curl -X 'PATCH' \
    'https://abr.example.com/api/indexers/MyAnonamouse' \
    -H 'accept: application/json' \
    -H 'Authorization: Bearer MaEqMYAGY3qvXxtje6-YDxcs4damlyRaKzTC8itG2b8' \
    -d '{"mam_session_id":"bXDv1tC1d2MVvOypbFy8Q4Q-rz6q-bKwdqaSZzm85Dg", "enabled": true}'
2.3 - OpenID Connect with Authentik
Setting up OIDC login
OIDC allows you to use the same login across multiple apps. This guide will show
you how to set up OIDC with Authentik, but the concepts are the same or similar
for other providers.
Setup a provider on Authentik
-
You want to first create an application on Authentik. The settings here
don’t play a role for AudioBookRequest though.
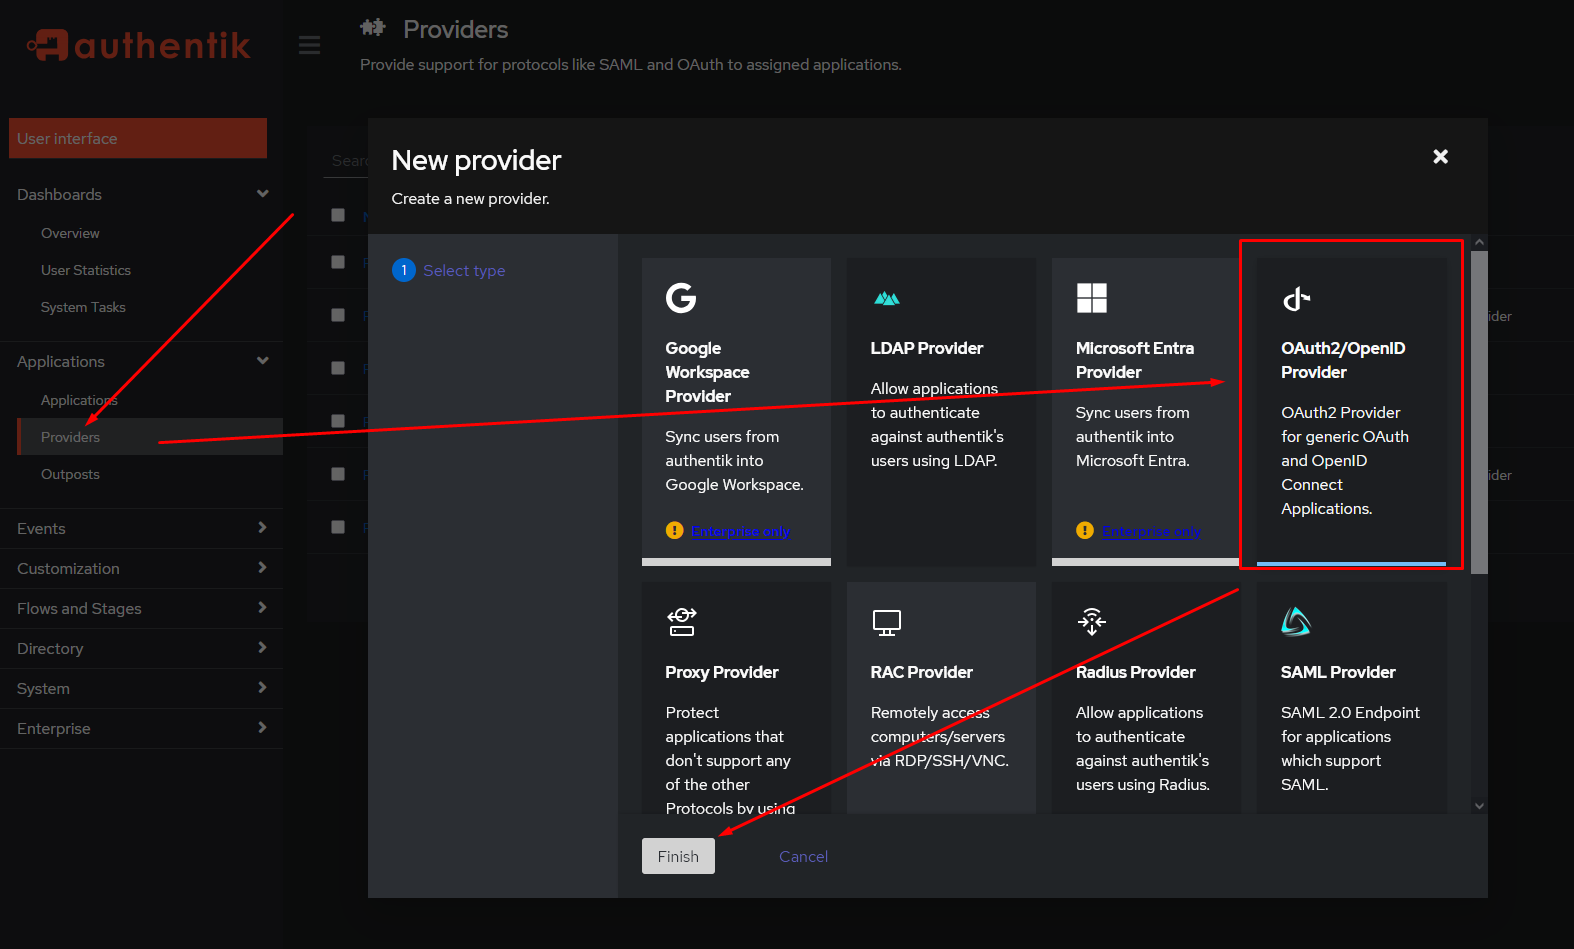
-
You then want to create an OAuth2/OpenID Provider:
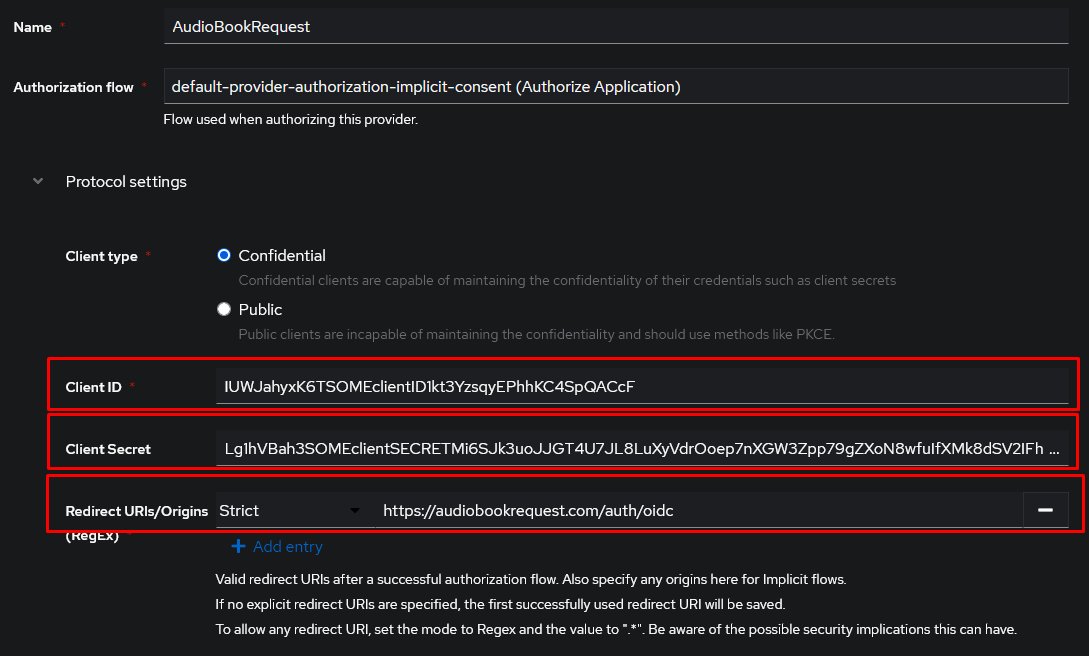
-
Configure the settings as preferred. The important two values are the
Client ID and Client Secret. Take note of those. You should also set the
redirect URL that the OIDC provider will redirect you to after a succesful
login. This has to be the domain of your ABR instance with /auth/oidc
appended.
Warning
Make sure you correctly set
http or https in the redirect URL. This depends on how you access
AudioBookRequest.
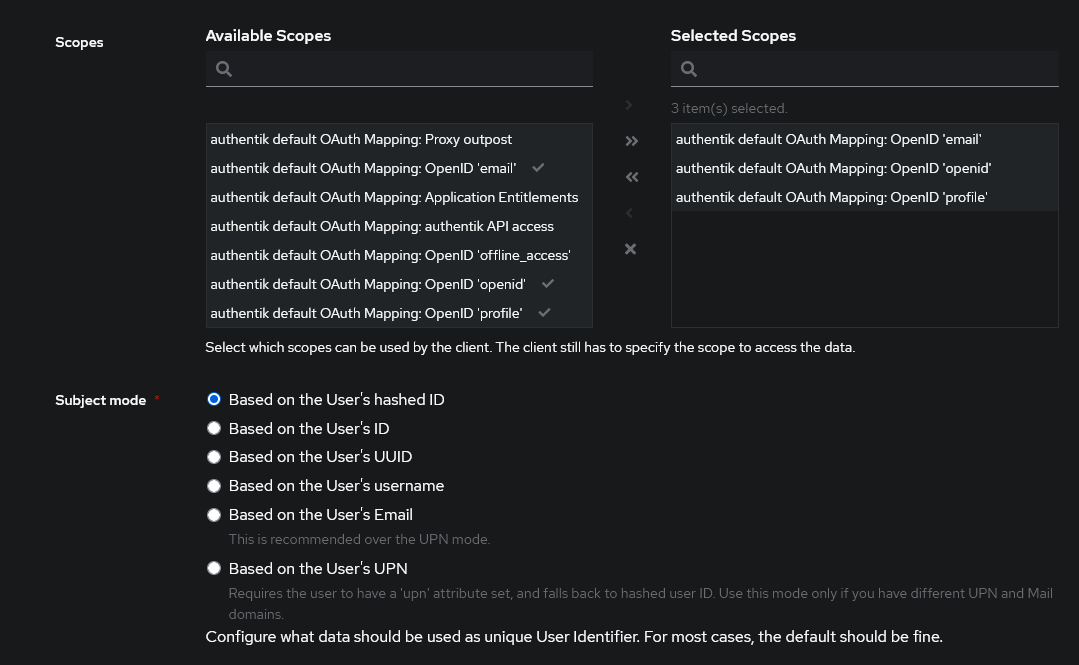
-
Set the scopes that ABR can get access to. You should always allow for the
openid scope. Any other scopes are optional. You’ll have to check with
your OIDC provider to see what what scopes are required to get a
name/username and groups. “Subject mode” is a unique identifier for the
user. This can be used as the username on ABR.
-
Assign your newly created provider to the ABR application.
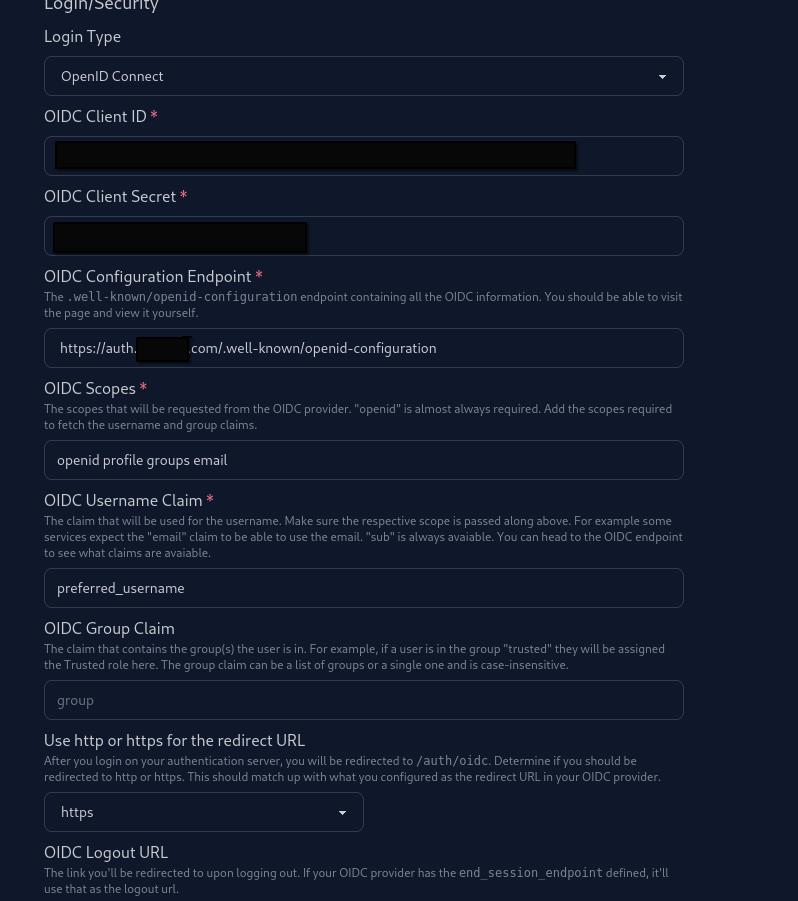
Setup settings in ABR
- On AudioBookRequest, head to
Settings>Security and set the “Login Type” to
“OpenID Connect”.
- Paste the “Client ID” and “Client Secret” into the respective fields.
- Your “OIDC Configuration Endpoint” depends on the OIDC provider you use. For
Authentik, it’s usually along the lines of
https://domain.com/application/o/audiobookrequest/.well-known/openid-configuration.
You’ll have to find that for your own provider. Visiting the url should give
you a JSON-formatted object with different endpoints and details given.
- The “OIDC Scopes” are the ones defined above separated by a space.
openid
is always required. Any other scopes like email or group are only
required if you intend to use the email for the username or respectively
extract the group of the user.
- “OIDC Username Claim” has to be a unique identifier which is used as the
username for the user.
sub is always available, but you might prefere to
use email or username (with the correctly added scope).
- Depending on what you used above for the redirect URL, set
http or https.
Warning
http/s has to match-up with
what protocol your redirect-url uses. Providers will reject logins if this
does not match up.
- Optional: The “OIDC Logout URL” is where you’re redirected if you select to
log out in ABR. OIDC Providers allow you to invalidate the session on this
URL. While this value is optional, not adding it might break logging out
slightly because the session can’t properly be invalidated.
Groups
“OIDC Group Claim” is optional, but allows you to handle the role distribution
of users in your OIDC provider instead of in ABR. The exact claim that sends
along the information depends on your OIDC provider. The OIDC provider can
provide a single string or list of strings.
The groups have to be named exactly one of untrusted, trusted, or admin.
The letter case does not matter.
For Authentik, the group claim name is groups and requires the
profile scope. If you assign a user to a group named trusted, that user will
receive the Trusted role once they login to AudioBookRequest.
2.3.1 - OpenID Connect with Authelia
Setting up OIDC login
Fundamentally it should be similar to how Authentik is setup. This page just shows an example config you can use.
There’s a relevant Authelia Github Issue for a little more information.
Use the following config:
client_id: 'clientID'
client_name: 'AudioBookRequest'
client_secret: '[secret]'
public: false
authorization_policy: 'one_factor'
require_pkce: 'false'
redirect_uris:
  - 'https://abr.example.com/auth/oidc'
scopes:
  - 'openid'
  - 'profile'
  - 'groups'
  - 'email'
response_types:
  - 'code'
grant_types:
  - 'authorization_code'
access_token_signed_response_alg: 'none'
userinfo_signed_response_alg: 'none'
token_endpoint_auth_method: 'client_secret_post'
Importantly:
redirect_uris needs to end with /auth/oidctoken_endpoint_auth_method needs to be client_secret_post (not ending in ...basic)
Here’s an example configuration on ABR in the Security settings:
2.4 - Update indexer configuration from file
Update indexer configuration options using a file
Overview
You can set up a JSON file that will be used to populate the indexer
configuration options. This can be useful if you have a value that needs to
constantly change, but you don’t want to have to work with the
ABR API.
How to set up file configuration
- Create a JSON file with the desired options. The layout is a 2-layer object.
The top-level is an object with key for each indexer type (for example
MyAnonamouse). The value is an object containing a key for each config that
you want to update.
- Ensure the JSON file is visible by ABR. Add it as a volume or copy it into
the Docker container.
- Head to
Settings>Indexers
- At the bottom, enter the path to the JSON file. It’s best to pass in an
absolute path.
- You’re done! ABR will now check for updates to the file and update the
configurations if there’s ever any change.
Example
This is an example of a legal JSON file that would update the mam_id.
{
  "MyAnonamouse": {
    "mam_session_id": "test3"
  }
}
3 - Concepts
Concepts used in ABR in more detail.
3.1 - Environment Variables
List of the environment variables that can be set.
| ENV |
Description |
Default |
ABR_APP__PORT |
The port to run the server on. |
8000 |
ABR_APP__DEBUG |
If to enable debug mode. Not recommended for production. |
false |
ABR_APP__OPENAPI_ENABLED |
If set to true, enables an OpenAPI specs page on /docs. |
false |
ABR_APP__CONFIG_DIR |
The directory path where persistant data and configuration is stored. If ran using Docker or Kubernetes, this is the location a volume should be mounted to. |
/config |
ABR_APP__LOG_LEVEL |
One of DEBUG, INFO, WARN, ERROR. |
INFO |
ABR_APP__BASE_URL |
Defines the base url the website is hosted at. If the website is accessed at example.org/abr/, set the base URL to /abr/ |
|
ABR_DB__SQLITE_PATH |
If relative, path and name of the sqlite database in relation to ABR_APP__CONFIG_DIR. If absolute (path starts with /), the config dir is ignored and only the absolute path is used. |
db.sqlite |
ABR_APP__DEFAULT_REGION |
Default audible region to use for the search. Has to be one of us, ca, uk, au, fr, de, jp, it, in, es, br. |
us |
ABR_APP__FORCE_LOGIN_TYPE |
Forces the login type and prevents it from being modified. Can be one of basic, forms, oidc, or none to disable the login. oidc requires both the ABR_APP__INIT_ROOT_USERNAME and ABR_APP__INIT_ROOT_PASSWORD environment variables to be set. |
|
ABR_APP__INIT_ROOT_USERNAME |
Sets the initial username of the root user when first launching ABR. Has no effect if a root admin already exists. |
|
ABR_APP__INIT_ROOT_PASSWORD |
Sets the initial password of the root user when first launching ABR. Has no effect if a root admin already exists. |
|
ABR_DB__USE_POSTGRES |
Whether to use Postgres as a database. Ensure the connection settings are valid. |
false |
ABR_DB__POSTGRES_HOST |
Host URL/IP of the postgres instance. |
localhost |
ABR_DB__POSTGRES_PORT |
Port of the postgres instance. |
5432 |
ABR_DB__POSTGRES_DB |
Database name of the postgres instance. |
audiobookrequest |
ABR_DB__POSTGRES_USER |
Username of the postgres database. |
abr |
ABR_DB__POSTGRES_PASSWORD |
Password of the postgres database. |
password |
ABR_DB__POSTGRES_SSL_MODE |
SSL mode to use for the postgres instance. |
prefer |
Note
There are two underscores (__) between the first
and second part of each environment variable like between ABR_APP and PORT.
4 - Local Development
How to set up the project for local development.
Requirements
- Python >3.12
- uv. Used as the package manager
- node.js. Exact version is not too important. Too old versions might fail when
installing packages.
Setup
Virtual environments help isolate any installed packages to this directory.
Project was made with Python 3.12 and uses new generics introduced in 3.12.
Older python versions might not work or could have incorrect typing.
For improved dependency management, uv is used instead of pip.
# This creates the venv as well as installs all dependencies
uv sync
For local development, environment variables can be added to .env.local and
they’ll be used wherever required. This file is not used in production.
Initialize Database
Alembic is used to create database
migrations. Run the following before starting up the application for the first
time. It will initialize the directory if non-existant, create the database file
as well as execute any required migrations.
uv run alembic upgrade heads
In case of any model changes, remember to create migrations using
alembic revision --autogenerate -m "<message>".
Generate the CSS files
Tailwindcss is used to style elements using CSS. On
top of that, daisyUI is for easy and consistent
component styling.
Install daisyUI and start Tailwindcss watcher. Required for any CSS styling.
npm i
uv run tailwindcss -i static/tw.css -o static/globals.css --watch
# Alternatively npx can be used to run tailwindcss
npx @tailwindcss/cli@4 -i static/tw.css -o static/globals.css --watch
Tailwind has to run anytime something is changed in the HTML template files.
Run the app
Running the application is best done in multiple terminals:
-
Start FastAPI dev mode:
Website can be visited at http://localhost:8000.
-
Optional: Start browser-sync. This hot reloads the website when the html
template or python files are modified:
browser-sync http://localhost:8000 --files templates/** --files app/**
NOTE: Website has to be visited at http://localhost:3000 instead.
Docker Compose
The docker compose can also be used to run the app locally. Any services that
are required can be added to it for easy testing:
docker compose up --build
The local context (ABR) is in a docker compose profile called local, which is
only run if explicitly stated as follows:
docker compose --profile local up
5 - Contribution Guidelines
How to contribute to the docs.
We use Hugo to format and generate our website, the
Docsy theme for styling and site structure,
and Github Pages to manage the deployment of the
site. Hugo is an open-source static site generator that provides us with
templates, content organisation in a standard directory structure, and a website
generation engine. You write the pages in Markdown (or HTML if you want), and
Hugo wraps them up into a website.
All submissions require review. We use GitHub pullas requests for this purpose.
Consult GitHub Help for
more information on using pull requests.
Quick start with Hugo
Here’s a quick guide to updating the docs. It assumes you’re familiar with the
GitHub workflow and you’re happy to use the automated preview of your doc
updates:
- Fork the
AudioBookRequest repo on
GitHub.
- Make your changes and send a pull request (PR).
- If you’re not yet ready for a review, add “WIP” to the PR name to indicate
it’s a work in progress. (Don’t add the Hugo property “draft = true” to
the page front matter, because that prevents the auto-deployment of the
content preview described in the next point.)
- When you’re ready for a review, add a comment to the PR, and remove any “WIP”
markers.
Updating a single page
If you’ve just spotted something you’d like to change while using the docs,
Docsy has a shortcut for you:
- Click Edit this page in the top right hand corner of the page.
- If you don’t already have an up to date fork of the project repo, you are
prompted to get one - click Fork this repository and propose changes or
Update your Fork to get an up to date version of the project to edit. The
appropriate page in your fork is displayed in edit mode.
- Follow the rest of the Quick start with Hugo
process above to make, preview, and propose your changes.
Previewing your changes locally
If you want to run your own local Hugo server to preview your changes as you
work:
-
Follow the instructions in Getting started to
install Hugo and any other tools you need. You’ll need at least Hugo
version 0.146.0 (we recommend using the most recent available version), and
it must be the extended version, which supports SCSS.
-
Fork the
AudioBookRequest repo into
your own project, then create a local copy using git clone.
git clone --branch v0.12.0 --depth 1 https://github.com/markbeep/AudioBookRequest.git
-
Run hugo server in the site root directory. By default your site will be
available at http://localhost:1313/. Now that you’re serving your site
locally, Hugo will watch for changes to the content and automatically refresh
your site.
-
Continue with the usual GitHub workflow to edit files, commit them, push the
changes up to your fork, and create a pull request.
Creating an issue
If you’ve found a problem in the docs, but you’re not sure how to fix it
yourself, please create an issue in the
AudioBookRequest repo.
You can also create an issue about a specific page by clicking the Create
Issue button in the top right hand corner of the page.
Useful resources